
To the few that come and visit I have a favor to ask and in return I will try to help you:) One of the reasons (pretty much the biggest reason) I started this blog was to get me back into baking and remembering techniques and skills I've learned. I've been out of school for almost 3 years and haven't had many opportunities to really use my skills and knowledge to the best of my ability.
A few Sundays ago we had a lesson in Relief Society about ways we can use our degrees and continue to expand on them. I've tried many times to go back into my books, but it's kinda hard. I get distracted and what not. So this is where you all come in. I want to know what you all want to know about baking. Whether it's different techniques, cooking methods, recipes, food lingo, whatever! You can ask as many as you want. The more the merrier. I will then answer those questions in different posts. So stay tuned to find the answer to your questions, and to many others!
Tuesday, March 30, 2010
Questions Please!
Sunday, March 21, 2010
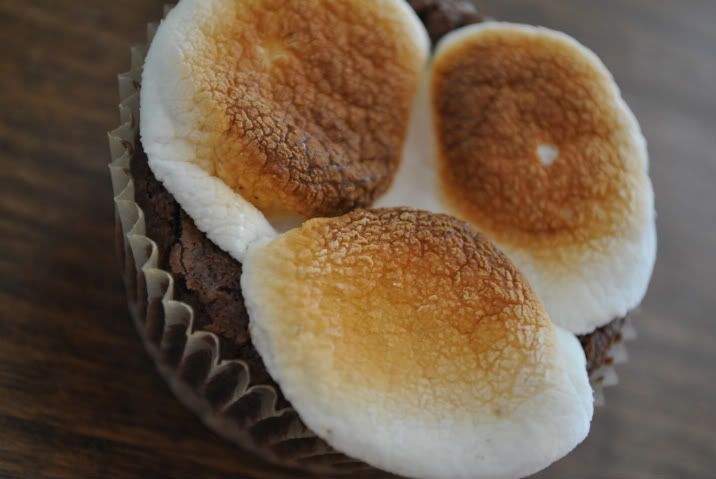
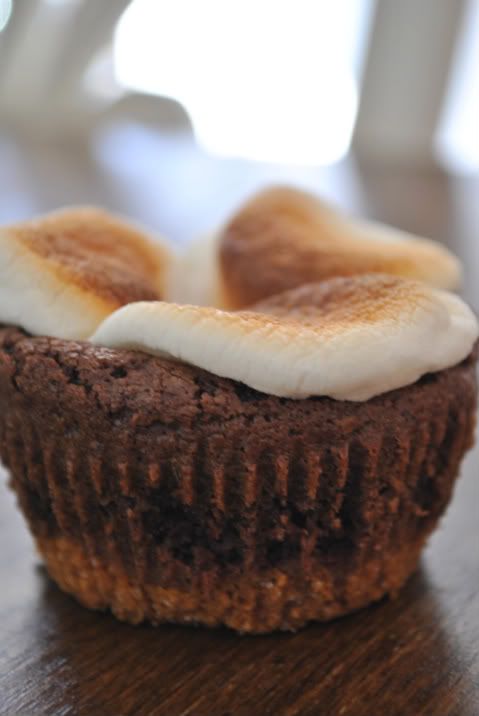
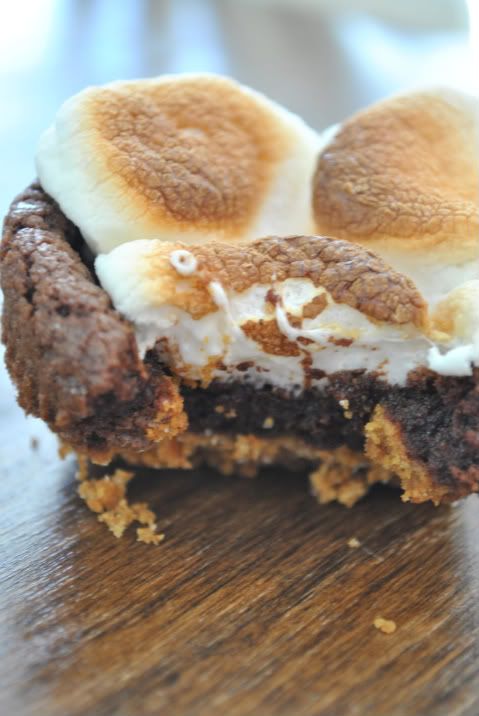
S'more Brownies
Growing up I was never much of a camper (still really not, but trying to be). The only thing that could really entice me were the s'mores. Gooey marshmallows toasted and squished in between graham crackers and chocolate. Mmm.....Heavenly..... For Christmas one year I even got a s'mores maker. I could have the gratification of a s'mores and not have to be outside camping! I loved it. I was satisfied with toasting the marshmallows over a candle just to have this simple treat. So when I fell upon a recipe for a s'mores brownie I knew I had to make it.
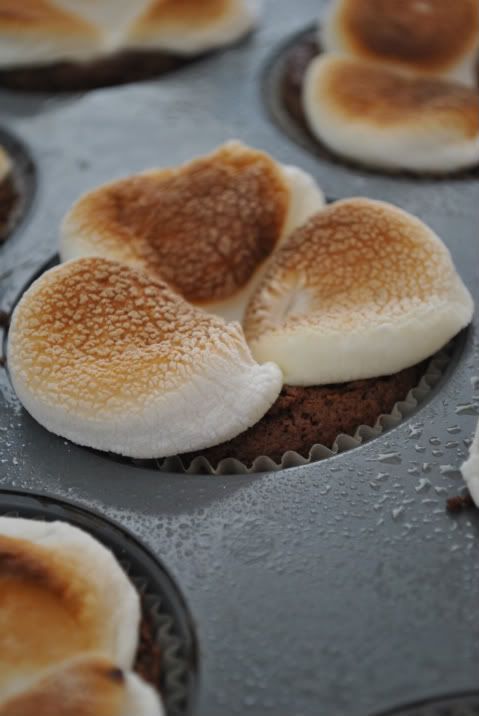
I found many recipes, but one from Food Network stood out the most. It had a graham cracker crust, brownie center, and toasted marshmallows on top. Many had everything mixed in together. But one of the best parts of a s'more is biting into each layer of goodness. The only downside to the Food Network recipe was that the brownie portion had really bad reviews. So i just went ahead and used my own brownie recipe. You could probably use just a box too. I also made mine in a muffin pan rather than an 8x8 pan. I honestly think it was much easier to make it this way and they were already individually portioned. I ended up with 15 brownies.
S'more Brownies
Crust from Food Network Kitchens-Brownie from Allrecipes.com
Crust:
6 tbsp. unsalted butter, melted
1 1/2 c. crushed graham cracker crumbs
2 tbsp. sugar
Pinch fine salt
Brownie:
3/4 c. butter, melted
1 1/2 c. sugar
1 1 /2 tsp. vanilla
2 eggs
3/4 . flour
1/2 c. cocoa
1/4 tsp. baking powder
1/4 tsp. salt
Topping:
4 c. large marshmallows
- Position a rack in the lower third of the oven and heat oven to 325F. Line an 8x8 square baking pan with foil so it hangs over the edges by about 1 inch.
- For the crust lightly butter the foil with some of the melted butter. Stir in rest of the butter together with the crumbs, sugar, and salt in a medium bowl. Press the crumb mixture evenly over the bottom of the pan. Bake until golden brown, about 20 minutes.
- Meanwhile, make the brownie. Cream together melted butter, sugar, vanilla, and eggs. In a separate bowl mix together flour, cocoa, baking powder, and salt. Mix dry ingredients with wet ingredients. Mix just until incorporated. You don't want to over mix.
- Pour batter into the prepared pan. Bake until a toothpick inserted in the middle comes out mostly clean, with a few crumbs, about 25-30 minutes.
- Remove from the oven and carefully position a rack about 6 inches from the boiler and preheat on low. Layer marshmallows across the top and toast under the broiler until golden. (keep an eye it, it can go quick), about 2 minutes. Cool on a rack, gently remove the brownies from the pan using aluminum flaps. Carefully separate any marshmallow form the foil and fold away. Cut into 12 (2-inch) squares.
- Position a rack in the lower third of the oven and heat oven to 325F. Line muffin pan with liners. Spray with a light coat of pam.
- For the crust stir in the butter together with the crumbs, sugar, and salt in a medium bowl. Fill each liner with 2 tablespoons of mixture. Using the back of a spoon, or the bottom of a small cup, press crust to form to the bottom. Bake until golden brown, about 8 minutes.
- Meanwhile, make the brownie. Cream together melted butter, sugar, vanilla, and eggs. In a separate bowl mix together flour, cocoa, baking powder, and salt. Mix dry ingredients with wet ingredients. Mix just until incorporated. You don't want to over mix.
- Pour batter into the prepared pan (about 1 heaping tablespoonful). Bake until a toothpick inserted in the middle comes out mostly clean, with a few crumbs, about 15-18 minutes.
- Remove from the oven and carefully position a rack about 6 inches from the boiler and preheat on low. Layer marshmallows across the top of each brownie (use small marshmallows, or cut large in half) and toast under the broiler until golden. (keep an eye it, it can go quick), about 1-2 minutes. Cool on a rack.
Thursday, March 18, 2010
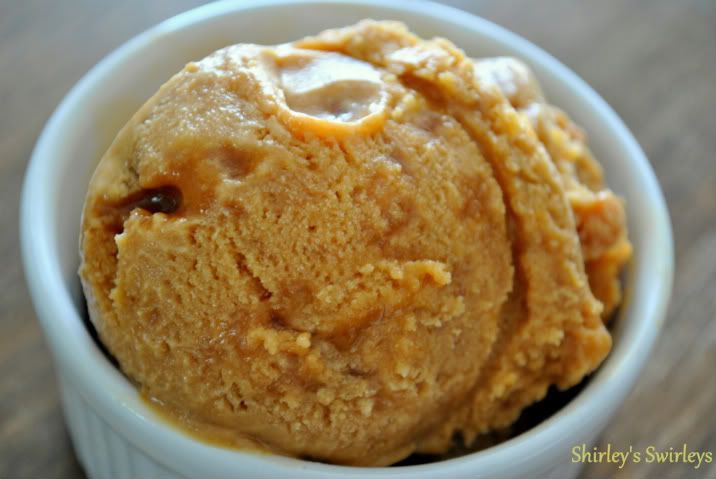
Salted Butter Caramel Ice Cream
A while back I tried a recipe for Salted Carmel Cupcakes. It was a flop. A huge flop. It just sounded so good, but was so disappointing in the end. Lately I've been seeing a lot of recipes with salted caramel. Truffles, brownies, cupcakes. Then I fell upon David Lebovitz website. He has a recipe for Salted Butter Carmel Ice Cream. It intrigued me. I had a gallon of heavy cream so I decided I might as well venture out and make it.
Making caramel use to really intimidate me. That was until I realized it's not all that hard, and the more you make it the more you really know when it's done. Practice makes perfect right?! Anyway, you have to make caramel twice for this ice cream. Once for the base, and the other to make a little praline that is stirred in at the end. If you don't know how to make caramel, or want to become better, David has a great post How to Make the Perfect Caramel explaining the steps. Much better than I could ever explain.
Most ice creams I've tried, with caramel, have very little caramel flavor, and it's more sweet I think. This is not the case. Still sweet, but has a very strong caramel flavor. The whole thing is caramel. Don't know why I didn't think of that when making it. I thought the pralines would add a little crunch factor, but they melt instead. I'm glad I decided to try another salted caramel recipe. This one produced a much better and exciting outcome!
Salted Butter Caramel Ice Cream
For the caramel praline (mix-in):
½ cup sugar
¾ teaspoon sea salt
For the ice cream custard:
2 cups whole milk, divided
1½ cups sugar
4 tablespoons salted butter
scant ½ teaspoon sea salt
1 cups heavy cream
5 large egg yolks
¾ teaspoon vanilla extract
- 1. To make the caramel praline, spread the ½ cup (100 gr) of sugar in an even layer in a medium-sized, unlined heavy duty saucepan: I use a 6 quart/liter pan. Line a baking sheet with a silicone baking mat or brush it sparingly with unflavored oil
- Heat the sugar over moderate heat until the edges begin to melt. Use a heatproof utensil to gently stir the liquefied sugar from the bottom and edges towards the center, stirring, until all the sugar is dissolved. (Or most of it—there may be some lumps, which will melt later.) Continue to cook stirring infrequently until the caramel starts smoking and begins to smell like it's just about to burn. It won't take long.
- Without hesitation, sprinkle in the ¾ teaspoon salt without stirring (don't even pause to scratch your nose), then pour the caramel onto the prepared baking sheet and lift up the baking sheet immediately, tilting and swirling it almost vertically to encourage the caramel to form as thin a layer as possible. Set aside to harden and cool.
- To make the ice cream, make an ice bath by filling a large bowl about a third full with ice cubes and adding a cup or so of water so they're floating. Nest a smaller metal bowl (at least 2 quarts/liters) over the ice, pour 1 cup (250 ml) of the milk into the inner bowl, and rest a mesh strainer on top of it.
- Spread 1½ cups (300 gr) sugar in the saucepan in an even layer. Cook over moderate heat, until caramelized, using the same method described in Step #2.
- Once caramelized, remove from heat and stir in the butter and salt, until butter is melted, then gradually whisk in the cream, stirring as you go. The caramel may harden and seize, but return it to the heat and continue to stir over low heat until any hard caramel is melted. Stir in 1 cup (250 ml) of the milk.
- Whisk the yolks in a small bowl and gradually pour some of the warm caramel mixture over the yolks, stirring constantly. Scrape the warmed yolks back into the saucepan and cook the custard using a heatproof utensil, stirring constantly (scraping the bottom as you stir) until the mixture thickens. If using an instant-read thermometer, it should read 160-170 F (71-77 C).
- Pour the custard through the strainer into the milk set over the ice bath, add the vanilla, then stir frequently until the mixture is cooled down. Refrigerate at least 8 hours or until thoroughly chilled.
- Freeze the mixture in your ice cream maker according to the manufacturer's instructions.
- While the ice cream is churning, crumble the hardened caramel praline into very little bits, about the size of very large confetti (about ½-inch, or 1 cm). I use a mortar and pestle, although you can make your own kind of music using your hands or a rolling pin.
- Once your caramel ice cream is churned, quickly stir in the crushed caramel, then chill in the freezer until firm.
Note: As the ice cream sits, the little bits of caramel may liquefy and get runny and gooey, which is what they're intended to do.
Wednesday, March 17, 2010
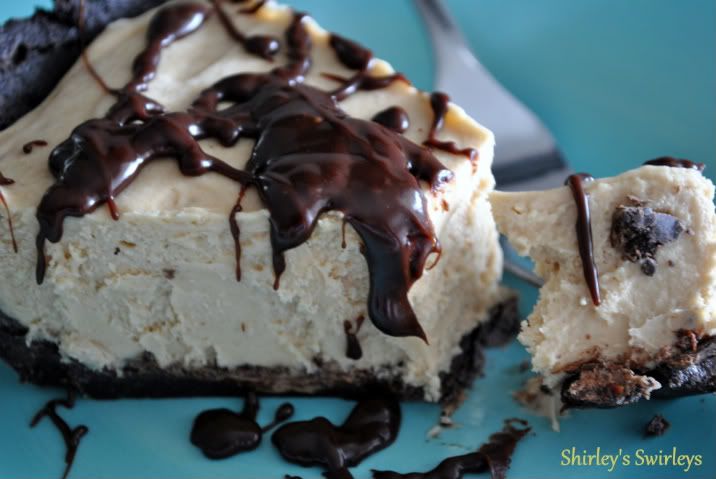
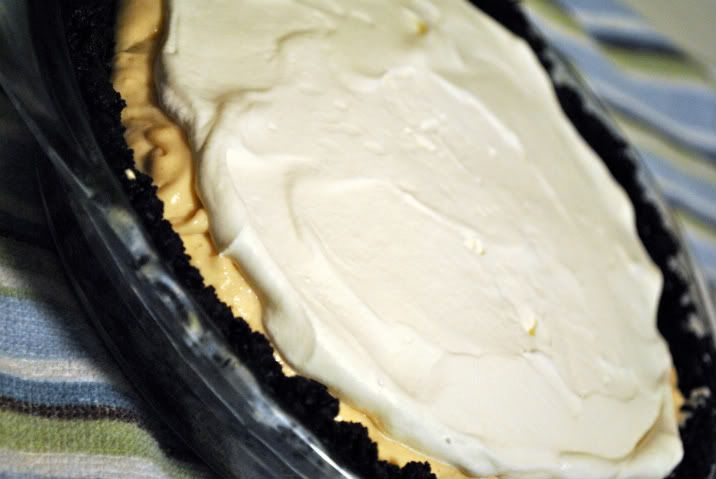
Peanut Butter Pie with Cookie Crust
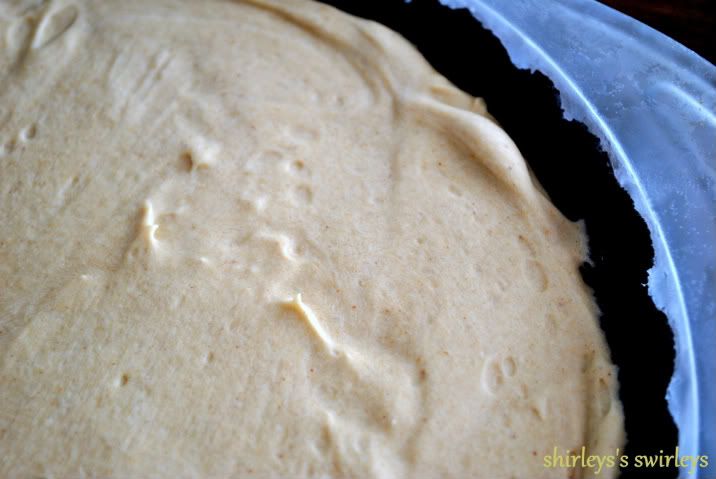
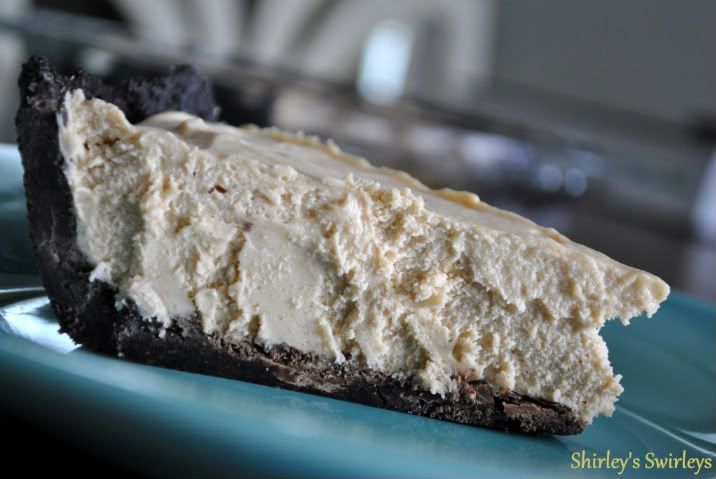
It's rich and creamy. Nothing too fancy, but nice and simple. My favorite part, it's served cold with a hot fudge sauce. Delightful. I'm not a huge semi-sweet or dark chocolate fan. So I usually use milk chocolate no matter what. This definitely needs semi-sweet and dark chocolate. Using milk chocolate would have made it way too sweet and not as flavorful. Having the semi-sweet in the pie and the dark and milk chocolates for the sauce gave it a great combination. My taste buds were lovin it!
Peanut Butter Pie with Cookie Crust
Recipe from Baked: New Frontiers in Baking
Crust:
30 chocolate wafer cookies (about 6oz.)
1 tbsp. granulated sugar
6 tbsp. unsalted butter, melted
- 1. Using a food processor, grind cookies to a fine powder. Transfer to a bowl and stir in sugar. Pour the butter over the mixture and mix until well combine.
- 2. Press the crumb mixture into the bottom and up the sides of a 9-inch pie pan. Put the crust in the refrigerator.
Filling:
1/2 cup (3 oz.) semisweet chocolate chips
1/2 tsp. light corn syrup
8 oz. cream cheese, at room temperature
1 cup creamy peanut butter
2 tbsp. vanilla extract
3.4 cup firmly packed dark brown sugar
1 1/2 cups heavy cream
- 1. Melt chocolate chips in microwave, or double boiler. Stir in corn syrup. Spread the chocolate in a thin layer on the bottom of the chilled pie crust. Return the crust to the refrigerator.
- 2. Using an electric mixer, combine cream cheese, peanut butter, vanilla, and brown sugar on medium speed until well combined and smooth. Set aside.
- 3. In another bowl, use the mixer to whisk the cream until soft peaks form. Gently fold whipped cream into peanut butter mixture until uniform in color.
- 4. Pour the mixtuer into the prepared crust and freese for at least 4 hours. Once frozen, the pie can be coverd with aluminum foil and kept in the freezer for up to 3 days.
Hot Fudge Sauce:
6 oz. milk chocolate, finely chopped
6oz. dark chocolate (64% cacao), finely chopped
1 cup heavy cream
1/4 cup light corn syrup1. Place both chocolates in a heat-proof bowl. Set aside.
- 2. In a small saucepan, bring the cream to a simmer over medium heat. Stir in corn syrup. Remove from heat and pour over chocolate. Allow to sit for 2 minutes. Starting in the center and working out to the edges, whisk the chocolate mixture in a circle until smooth.
- 3. Spoon onto pieces of pie before serving.
- 4. After sauce is cooled to room temperature, it can be covered tightly and kept in the refrigerator for 3 days. Rewarm sauce in a microwave on medium heat for 30 seconds. Stir and repeat until warm.
Monday, March 15, 2010
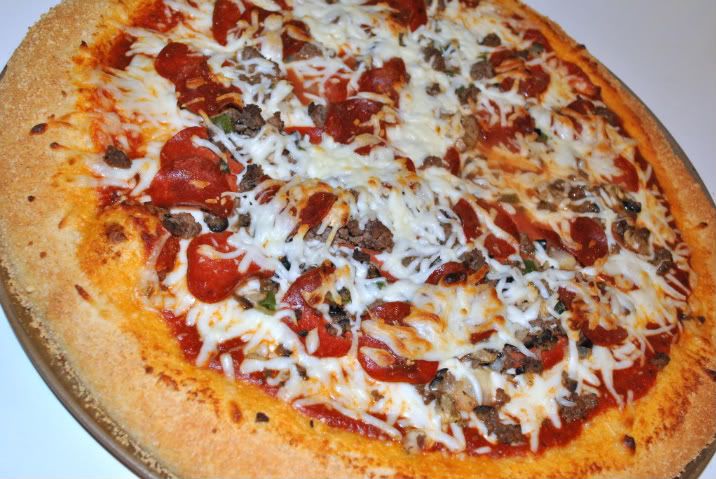
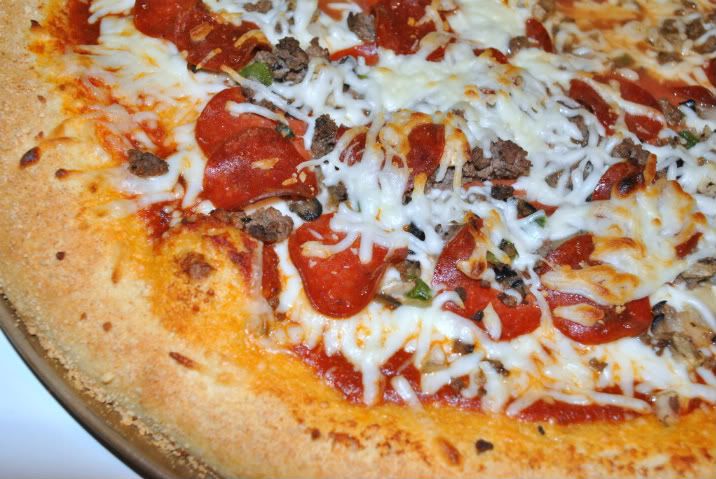
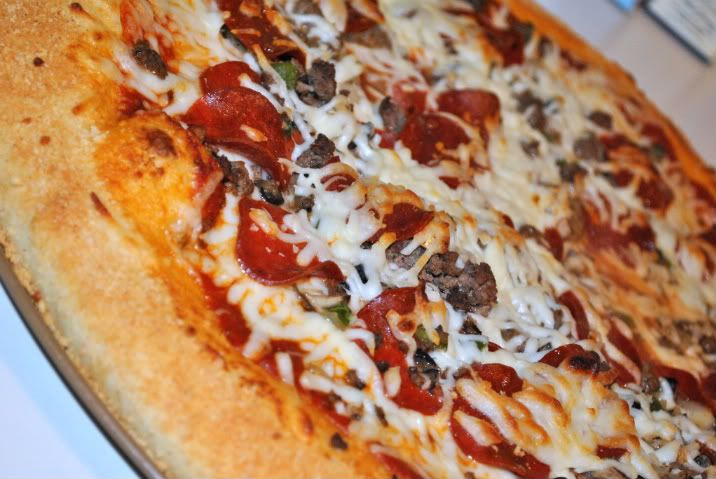
Pizza Dough
Todd and I use to have pizza pretty much ever Friday night. During the beginning of our marriage I was trying different pizza doughs quite often. I'd find one and kinda like, but after a few times I'd go searching for a new one. That was until I found The One.
Allrecipes.com
1 (.25 ounce) package active dry yeast
1 tablespoon white sugar
2 1/2 cups warm water (110 degrees F)
2 tablespoons olive oil
1 tablespoon salt
1/2 cup whole wheat flour
5 1/2 cups bread flour
- In a large mixing bowl, dissolve yeast and sugar in the warm water. Let sit until creamy; about 10 minutes.
- Stir the olive oil, whole wheat flour, salt and 4 cups of the bread flour into the yeast mixture. Mix in the remaining flour, 1/2 cup at a time, stirring well after each addition. When the dough has pulled together, turn it out onto a lightly floured surface and knead until smooth and elastic, about 8 minutes. Lightly oil a large mixing bowl, place the dough in the bowl and turn to coat with oil. Cover with a damp cloth and put in a warm place to rise until doubled in volume; about 1 hour.
- Deflate the dough and turn it out onto a lightly floured surface. Divide the dough into three equal pieces and form into rounds. Cover the rounds and let them rest for about 10 minutes. Preheat oven to 425 degrees F (220 degrees C).
- Use a rolling pin to roll the dough into the desired shape, cover it with your favorite toppings and bake at 425 degrees F (220 degrees C) for about 20 minutes or until the crust and cheese are golden brown.
(if you want to add a little extra flavor, before baking brush the crust with melted butter. Then sprinkle on some grated parmesan and garlic powder.)
Monday, February 22, 2010
Bananas
This past week I must have been craving bananas because everything I made consisted of the delicious fruit. The recipes I found just sounded so good. My first recipe to try out was a Banana Cream Pie from Our Best Bites.
This was suppose to be an easy and quick dessert, which is what really appealed to me. You're suppose to use a store bought pie crust, jello pudding, whip cream, and sweetened condensed milk. Well, when I got to the store they didn't have any of the Oreo crusts. I could have gone for just the regular graham cracker crust, but I really wanted the chunky monkey version. So I decided I could just make my own. Just an FYI, I wouldn't buy the store brand Oreos. Not nearly as good as the actual Oreo brand. I was trying to save money cause I didn't have a lot of extra cash on me, but really saving a dollar and losing on the quality was not worth it in the end. I also ended up just using cool whip, rather than whipping cream (i was trying to make this just a little healthier). The end product wasn't horrible, but it wasn't the best. I don't think the cool whip caused a problem cause the filling was pretty good. The main issue was pretty much the crust. It just gave an awful flavor. I'd try this again, but just make sure that I got an actual Oreo crust.

This last recipe was the one I was looking forward to the most. Banana Pudding Ice Cream from Home Sick Texan. I don't know, when I first read it, it just sounded perfect. Don't ask me why, for some reason I've been having a hankering for bananas. I love ice cream and then to make it a banana pudding ice cream. Mmmm.. delightful.

Anyway, it didn't quite turn out the way I imagined. It was pretty simple to make. I thought you would keep the sliced bananas in them, but after making the custard you let it sit for 45 minutes with the bananas, then remove the bananas, and let it chill for at least 4 hours. When I first took the bananas out I tasted the custard, but there was really no banana flavor, so I thought maybe it'll come out after chilling. Right... Nope. I knew it wouldn't, but I'm pretty sure I hoped it would. After freezing it, in my mixer, there was a very faint taste of banana. More of a little aftertaste. I was pretty bummed. Last night I sliced up bananas and served them with the ice cream and it tasted pretty darn good. Looking back at everything I did, my only conclusion is that my bananas weren't ripe enough so it didn't create enough flavor. I really want to make this again and see if that was my problem. If that wasn't the problem, then I'll throw it out, but as for now it's still a keeper.
Saturday, February 13, 2010
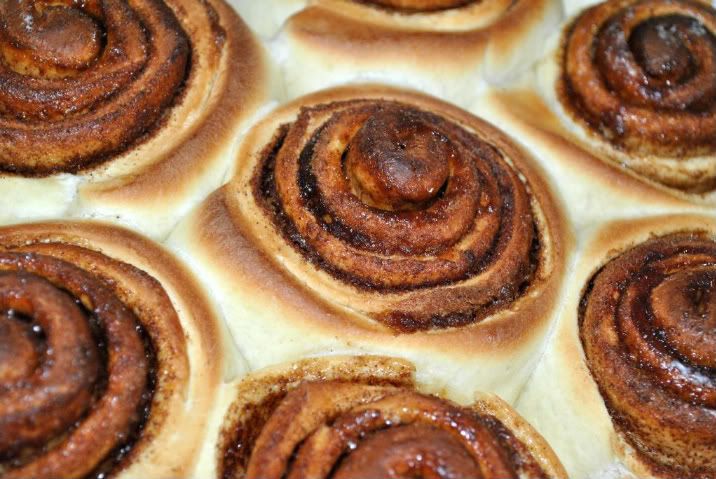
Cinnamon Rolls
My very first "real" job was working at Cinnamonster in Grapevine Mills Mall. I was 13 and it was the first time I received a check, not just money from babysitting. I thought I was pretty cool. It was also my first job working in some sort of a bakery. I can remember coming home from work and always smelling like cinnamon. My clothes, my hair, just me in general. I don't know if that's when I feel in love with cinnamon, but since then I cannot get enough of it.
My next job was at The House of Bread. My favorite bread...Cinnamon Swirl. It was soooo good. Especially when I was the Assistant Baker. I put so much extra cinnamon swirl goodness that when the breads came out, and were dumped on the racks, the filling would drip down. Seriously it was the best site ever.
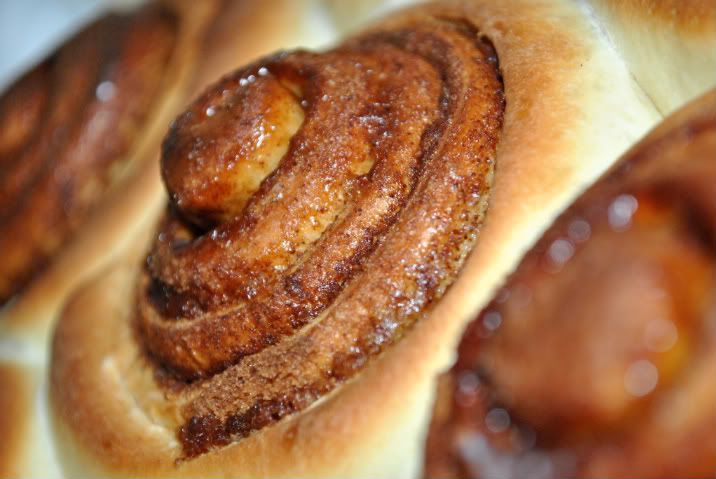
I have tried to recreate both the cinnamon swirl bread and cinnamon roll from my previous work experiences. I have now mastered one! The cinnamon roll. What's funny, to me at least, is that the recipe is actually called Clone of a Cinnabon. Cinnabon is Cinnamonster's competitor. But I have to admit these rolls are pretty close to what I can remember making as a 13 year old.
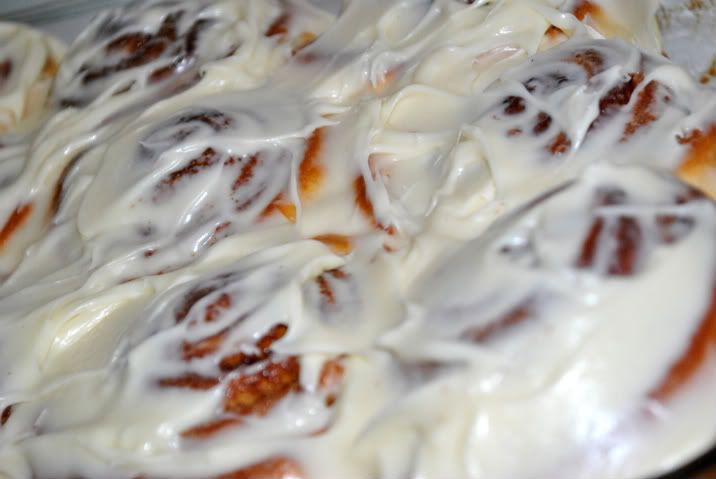
They come out, as told by my husband, "delicious, and cinnamatastic". Honestly they are truly just that. They're flaky, big, sweet, gooey...... I usually add a little more cinnamon, just because I can't get enough cinnamon. I think what reminds me the most of Cinnamonster's rolls is the frosting. Cream cheese frosting. Once again I add more cream cheese and not so much powder sugar. I just don't like having the flavor of powdered sugar.

Allrecipes.com
1 cup warm milk (110 degrees F/45 degrees C)
1/2 cup white sugar
2 1/2 teaspoons yeast
2 eggs, room temperature
1/3 cup margarine, melted
4 1/2 cups bread flour
1 teaspoon salt
1 cup brown sugar, packed
2 1/2 tablespoons ground cinnamon
1/3 cup butter, softened
1 (3 ounce) package cream cheese, softened
1/4 cup butter, softened
1 1/2 cups confectioners' sugar1/2 teaspoon vanilla extract
1/8 teaspoon salt
- Dissolve yeast and sugar in warm milk. Add eggs, margarine, flour and salt. Mix until a ball is formed. Knead until dough is smooth and elastic. Cover and let rest until doubled in size, about 1 hour.
- After the dough has doubled in size turn it out onto a lightly floured surface, cover and let rest for 10 minutes. In a small bowl, combine brown sugar and cinnamon.
- Roll dough into a 16x21 inch rectangle. Spread dough with 1/3 cup butter and sprinkle evenly with sugar/cinnamon mixture. Roll up dough and cut into 12 rolls. Place rolls in a lightly greased 9x13 inch baking pan. Cover and let rise until nearly doubled, about 30 minutes. Meanwhile, preheat oven to 400 degrees F (200 degrees C).
- Bake rolls in preheated oven until golden brown, about 15 minutes. While rolls are baking, beat together cream cheese, 1/4 cup butter, confectioners' sugar, vanilla extract and salt. Spread frosting on warm rolls before serving.